Job Type Templates Explained.

16 January, 2023
Job Type Templates

In this article we will help you understand how to use Job Type Templates to maximize your efficiency when scheduling jobs. In this article we will cover:

  • What is a Job Type Template?
  • How do I set up my Job Type Details?
  • How to set up automated communication for a Job Type Template.
  • How to set up future reminders for a Job Type Template.
  • Adding Line Items to a Job Type Template.
  • Setting up a recurring Job Type Template.

What is a Job Type Template?

Job Type Templates are a powerful way to manage the different types of services you provide to your customers. Once you have successfully set up your Job Type Templates, scheduling jobs will become easier than ever. 

With options such as automated communication, attaching relevant forms and setting up future reminders, your Job Type Template will do most of the time-consuming work for you. 

Setting up a Job Type Template properly will take you between 10 and 30 minutes, depending on how many tasks you would like to automate. Setting them up right the first time is that it is going to save you hours and hours down the track. Let’s dive into setting up your Job Type Templates!

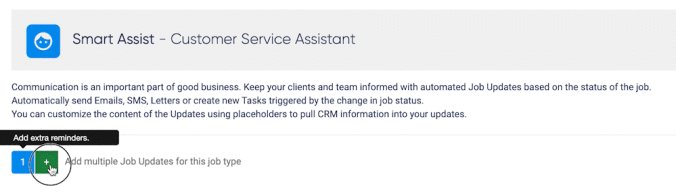
How do I set up my Job Type Template? 

To set up a new Job Type Template, select ‘Jobs’ in your top navigation bar and then select ‘Job Type Templates’. Once you are working in your Job Template page, select ‘+ New Job Type’.

In this first section (the ‘Job Detail tab’), you are going to fill out relevant information regarding the service that you would like to save as a Job Type. To set up this part of your job type you need to fill out:

Job Type: Name the service you are delivering to your customer. (E.g. ‘General Inspection’).

Title: The title of the service you are offering (visible to your client).

Description: Provide a description of the service you are providing (visible to your client).

Schedule Color: Set a specific color to be able to easily identify the different job type templates you have created.

Duration: Select the amount of time it takes to complete this service.

Priority: You can set the priority of this Job Type from low priority to urgent.

Web Forms: Attach relevant Web Forms to your Job Type Template (E.g. Client Agreements, Estimates, etc.).

Job Forms: Attach relevant Job Forms to your Job Type Template (E.g. Work Orders, Job Sheets, etc.).

Safety Forms: Attach relevant Safety Forms to your Job Type Template (E.g. Pre-Start Checks, Risk Assessments, etc.). 

Safety First Rule: Select if Safety forms need to be completed before accessing job forms (or not).

Groups Allowed: Select the User Groups that have access to complete this type of job (E.g. Senior Technicians only). 

How to set up automated communication for a Job Type

Select ‘Job Status Updates’ in the Job Type menu to start setting up your automated communications.

Click on the green ‘+-icon’ to set up one or more automated methods of communication.

 Now it’s time to select your preferred method of communication, including Email, SMS, Letter or Internal Task. You can select your preferred method of communication by clicking on the icon.

Each method will trigger its own set up process. In this article we will cover how to set up an automated email job status update. 

Before we start: to automatically populate information in your email, such as your clients name, email address and their preferred contact number, you are able to use placeholders

To select the available placeholder, hold down your control button and space bar simultaneously. 

Adding custom automated, customized communication for your job template

Communication is an important part of good business. Keep your clients and team informed with automated Job Updates based on the status of the job.

Automatically send Emails, SMS, Letters or create new Tasks triggered by the change in job status.

You can customize the content of the Updates using placeholders to pull CRM information and/or Job Details into your updates.


Adding a custom Email Template

  1. For your ‘Communication Type’, select ‘Email’. 
  2. Ensure your job status update is enabled (sliding toggle is green).
  3. Choose when you would like your automated job status update to be triggered (when you create your job, when the job is completed, etc.).
  4. Choose who should receive the email notification (Standard is ‘Contact’s Email).
  5. Select an Email Template if you have already created one. If not, leave this section as ‘Select’.
  6. Create a Subject line. You are able to use placeholders by pressing your control button and space button simultaneously. Placeholders will automatically populate the information that you have selected. For example: the placeholder ‘Contact’s Email’ will automatically populate the email address of the contact for whom the job has been booked.
  7. Write the email. Add placeholders where applicable to automatically populate relevant information. 


How to set up future reminders for a Job Type Template

Future reminders are a super helpful way to improve your communication with your clients. Most clients appreciate clear communication and as technology advances, customers increasingly expect business owners to update them on their booked services and appointments. 

Setting up future reminders is very similar to setting up a job status update. The most significant difference between setting up a reminder and job status update, is that a reminder allows you to set a time for when the reminder will be triggered.  

A great example of using a future reminder to impress your clients and take your client communication to the next level is sending a reminder a day (or multiple days) before the job is due to be completed. 

Adding line items to a Job Type Template

If you charge your clients for materials or other costs, adding a line item is a helpful way to manage your invoicing. Remember: a Job Type Template can easily be overwritten based on each individual job. 

The benefit of adding line items to your job type template, is that you no longer have to create your invoices from scratch for every single service. Simply edit the line items to reflect your completed job, done!  This is going to help save you so much time.

If you have already created line items for previous invoices then you can easily select them in this section of your Job Type Template. Haven’t created a line item before? No problem, simply select ‘Create New’ to create your first line item.

Setting up a recurring Job Type Template

If your service is provided on a recurring basis, such as a yearly inspection or a bi-weekly lawn service; setting recurring job type templates can help you save a lot of headache, and a lot of time!

To set a recurring Job Type Template, simply select the ‘Recurring Job’ tab and provide the preferred recurrence information:

Interval type: Choose your preferred time interval (Weekly, Monthly, Yearly, etc.) by selecting it from the drop down list.

Frequency: Each frequency is customisable based on the option that you have selected. For example: you can select ‘week’ -> ‘repeat every 3 weeks’, ‘Month’ -> ‘Repeat every 4 Months’, or any other option to reflect which interval you use for providing this particular service.

End type: ‘Job Count’ means: the amount of jobs/services you are providing until you want this recurrence to end. If you don’t want to set a job count, simply select ‘0’ (zero) for infinite recurrence. ‘Date’ means a specific date on which you would like this recurrence to end. This might be helpful when you have a specific contract with a client until a certain date. 

Create: Select the number of days before the start date of the Job that you would like this Job to be visible in the Scheduler.

Saving time with Job Type Templates

Setting up a Job Type Template might take you some time initially. But the benefits of setting up your Job Type Templates is that you only have to set it up once. You will quickly learn how much time you save with automating your processes.  

With automated scheduling, automated communications & reminders to your clients and the automated invoices/quotes you significantly reduce the amount of time that you spend on your administrative tasks.